How to Replace Car Door Speakers: A Step-by-Step Guide
Source:https://d2hucwwplm5rxi.cloudfront.net
You turn the volume knob up on your favorite track, expecting a crisp, punching bassline, but instead, you are greeted by a hollow, buzzing rattle. Your door speaker is blown. Factory car speakers are notoriously cheap—often constructed from flimsy paper cones and tiny magnets that degrade rapidly over time under harsh automotive temperature swings.
Over my decade-long career troubleshooting car electronics and ripping apart vehicle interiors, I have seen premium trim packages where the owner paid thousands extra, only to find audio hardware that looks like it belongs in a 1990s desktop computer. Upgrading your car’s audio system is one of the most satisfying weekend DIY projects you can tackle.
Learning how to replace car door speakers isn’t as daunting as it looks. You don’t need a degree in electrical engineering to get studio-quality sound on your morning commute—just a few basic tools, a little patience, and this systematic blueprint.
Gathering Your Tools and Pre-Flight Check
Before we begin unscrewing anything, you need to set yourself up for success. Scrambling to find a tool halfway through a job while holding a heavy plastic door panel by a couple of fragile wires is a recipe for disaster.
The Essential Tool Kit
-
Panel Removal Tools (Nylon/Plastic): Never use a metal flathead screwdriver to pry plastic door panels; you will gouge your interior plastic and scratch the paint underneath.
-
Phillips and Flathead Screwdrivers: For the hidden structural screws holding the panel to the metal door frame.
-
Socket Wrench Set: Many modern European and American vehicles use 7mm, 8mm, or 10mm bolts to secure the speaker housing.
-
Electrical Tape or Heat Shrink Tubing: To secure and insulate your wiring connections.
-
Wire Strippers/Crimping Tool: If you choose not to use plug-and-play wiring harnesses.
Understanding Your Speaker Setup: Coaxial vs. Component
When selecting your replacement speakers, you will encounter two main options. Think of your speaker system like a musical band.
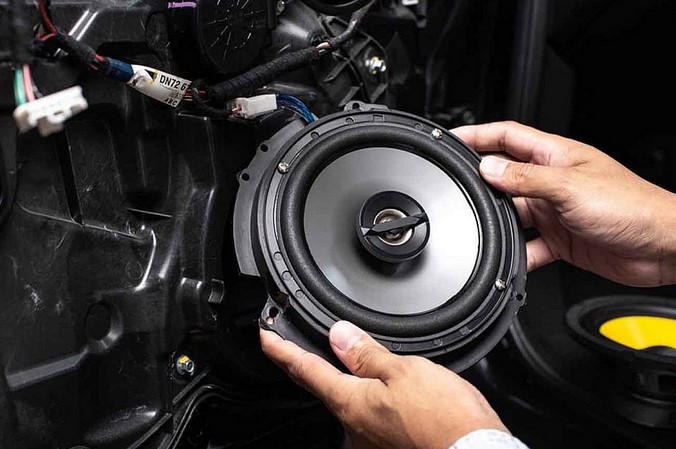
Coaxial Speakers (The All-In-One Performer)
Coaxial speakers are the most common aftermarket upgrade for beginners. They combine the woofer (for low-mid bass frequencies) and the tweeter (for high frequencies) into one single, self-contained unit. They are the ultimate plug-and-play solution because they drop right into the factory mounting location without any extra wiring modifications.
Component Speakers (The Divided Orchestra)
Component systems separate the woofer and the tweeter into distinct, individual units. They use an external electronic module called a crossover to act as a traffic cop, routing the deep bass frequencies strictly to the large door woofer and the crisp high notes strictly to the small tweeter up on your dashboard or sail panel. While they offer superior soundstage imaging, they require a bit more technical finesse to wire up correctly.
Step 1: Disconnecting the Battery and Locating Hidden Screws
Safety first. Before touching any electrical component in a modern vehicle, pop your hood and disconnect the negative terminal of your car battery. This simple step eliminates the risk of accidentally short-circuiting an electric window motor or triggering a diagnostic trouble code on your dashboard.
Now, let’s find the hidden structural fasteners holding your door card in place. Car manufacturers love to hide screws behind sleek plastic cosmetic covers to keep the interior looking seamless.
-
Check the Door Cup: Look inside the small pocket you grab to pull the door shut; there is almost always a rubber mat hiding a screw at the bottom.
-
Inspect the Door Handle: Peer behind the plastic trim piece directly behind your interior chrome door latch.
-
Scan the Perimeter: Run your fingers along the bottom and side edges of the door panel to check for exposed screws or plastic push-pins.
Step 2: Removing the Door Panel Safe and Sound
Once all the structural metal screws are completely removed, your door panel is held on solely by a series of plastic friction clips snapping it tightly against the sheet metal door frame.
Insert your nylon panel tool into the gap between the plastic panel and the metal door frame at the bottom corner. Gently pry outward until you hear a sharp pop—that is the plastic clip releasing its grip. Work your way around the bottom and sides of the door panel, popping clips one by one.
Once all the clips are unfastened, do not yank the door panel away violently. The panel is still physically tethered to the door lock release cable and the delicate wiring harness for your power windows and mirrors. Hold the panel steady, reach behind it, unclip the mechanical door cables, and depress the plastic tabs on the electrical connectors to completely free the door panel. Set it safely aside on a soft blanket so it doesn’t scratch.
Step 3: Extracting the Old Factory Speaker
With the door panel removed, you are looking directly at the bare metal door structure, covered by a plastic moisture barrier. The factory speaker is usually secured by three or four screws or, in some frustrating cases (looking at you, Volkswagen and Ford), metal rivets.
If your speaker is riveted in, simply use a power drill with a 1/4-inch drill bit to carefully drill out the center of the rivet until it pops free. Once unbolted, pull the speaker forward and disconnect the factory wiring plug from the terminal housing.
Step 4: Wiring and Mounting the New Aftermarket Speaker
This is where the magic happens. You have two pathways to hook up your new speaker’s positive and negative terminals to the car’s audio signals.
Option A: The Plug-and-Play Vehicle Harness (Highly Recommended)
You can buy cheap, vehicle-specific wiring adapters online. One end plugs directly into your car’s factory speaker connector, and the other end slides straight onto the spade terminals of your new speaker. No cutting, no soldering, no guesswork.
Option B: Splicing and Crimping
If you prefer to splice directly into the factory wires, you must pay strict attention to speaker polarity. Hooking the positive wire up to the negative terminal will cause your speakers to move out of phase.
Think of two speakers out of phase like two people pushing a swing from opposite sides; they cancel each other’s energy out, resulting in a total loss of low-end bass response. Use your vehicle’s wiring schematic to ensure positive matches positive, and crimp your connections tightly using insulated butt connectors.
[Factory Door Wire (+)] ---> [Adapter Harness] ---> [New Speaker Wide Terminal (+)]
[Factory Door Wire (-)] ---> [Adapter Harness] ---> [New Speaker Narrow Terminal (-)]
Mounting brackets are often required because aftermarket speaker frames are universal, while factory openings are irregular shapes. Screw the adapter bracket onto the metal door frame, secure your new speaker into the bracket, and tighten everything down flush to prevent air leaks that ruin bass performance.
Step 5: Testing and Reassembling the Interior
Before you put all those plastic clips and hidden screws back together, we need to verify that everything works flawlessly.
Reconnect your car battery terminal, turn your key to the accessory position, and fire up your stereo. Balance the sound completely to the side you just replaced. Listen closely for crisp high notes and distortion-free mid-bass. Test your power window switches to ensure the window glass glides down smoothly without striking the back of your new speaker magnet inside the door cavity.
If everything passes inspection, reverse your disassembly steps: line up the plastic door pins with their corresponding holes in the metal sheet, press firmly around the perimeter until you hear them snap back home, reinstall the hidden structural screws, and replace the cosmetic plastic covers.
Upgrading the Soundscape
Once both sides are fully completed, sit back in the driver’s seat and play your favorite high-fidelity track. The difference will be immediate. The muddy, washed-out tones of factory paper cones are gone, replaced by vibrant, clean audio separation that breathes entirely new life into your driving experience.
Are you planning to upgrade to a simple pair of drop-in coaxial speakers, or are you looking to build a full custom audio system with amplifiers and a dedicated crossover network? If you run into any stubborn plastic trim pieces along the way, drop your car’s year, make, and model in the comments below, and let’s troubleshoot it together!