How to Install a Lift Kit on a Truck: Essential Steps and Tools
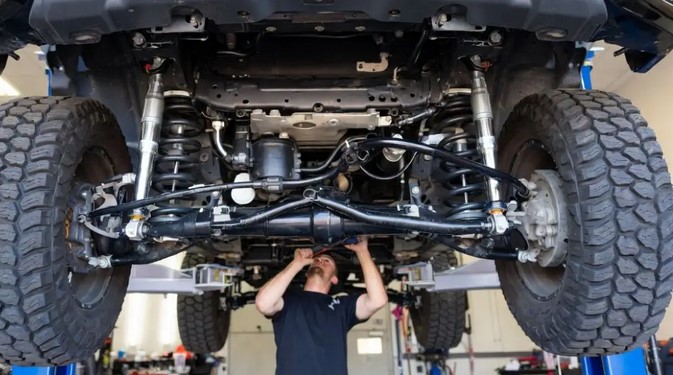
Source:https://gresham4wheeldrive.com
You’re standing in the driveway, looking at your stock truck. It’s capable, sure, but it looks like it’s wearing pants that are two sizes too small. You’ve just ordered a 3-inch suspension lift, and the boxes are sitting in your garage, mocking you. Most guys will tell you it’s a weekend job, but without the right strategy, it’s a “three-weeks-on-jack-stands” disaster waiting to happen.
In my twelve years of wrenching on everything from Baja-prepped Raptors to daily-driver Silverados, I’ve learned that a lift kit is more than just “making the truck taller.” It’s a fundamental alteration of your vehicle’s geometry. When I installed my first lift on an old K5 Blazer, I learned the hard way that if you don’t respect the driveline angles, the road will chew up your U-joints before you hit the trail.
Learning how to install a lift kit on a truck is an ambitious project, but if you have a mechanical mind and a sturdy set of jack stands, it is incredibly rewarding. Let’s break down the process from a perspective of grease, grit, and precision.
The “High Heels” Analogy: What Lifting Actually Does
Before we crack a single bolt, let’s get the physics straight.
The Stance Shift
Think of your truck like a professional athlete.
-
A Leveling Kit is like putting on a pair of supportive running shoes. it brings the front end up to match the rear, giving the truck a balanced “stance.”
-
A Full Suspension Lift is like putting that athlete in platform boots. You’re not just moving the body; you’re changing where the knees and ankles (the control arms and axles) sit in relation to the ground.
While it looks aggressive, you are shifting the center of gravity higher. This means your truck will handle differently—it won’t “carve” corners like it used to, and it will require more focus to drive at highway speeds.
Pre-Flight Check: The Essential Toolkit
Don’t even think about starting this with a basic $20 tool set from a big-box store. You are dealing with high-torque suspension components.
-
Heavy-Duty Jack and Jack Stands: You need stands rated for at least 3 to 6 tons. Never work under a truck supported only by a jack.
-
PB Blaster or Liquid Wrench: Start soaking every nut and bolt a week before you start. Trust me.
-
Breaker Bar and Torque Wrench: Suspension bolts require massive force to break loose and precise torque to put back together.
-
Spring Compressors: If you’re working with struts, these are literally life-savers.
-
Pitman Arm Puller: For those deep-dive kits that require steering modifications.
Step-by-Step Guide: How to Install a Lift Kit on a Truck
Step 1: Preparation and Measurement
Before you lift the truck, measure the distance from the center of the wheel to the bottom of the fender flare at all four corners. Record this. This is your “Baseline.” Once the kit is on, these numbers will tell you if the truck is sitting level or if something is bound up.
Step 2: The Front Suspension (The Hard Part)
On most modern trucks with Independent Front Suspension (IFS), the front is the most labor-intensive.
-
Disconnect the Sway Bar: This allows the suspension to “droop” further.
-
Remove the Shocks/Struts: This usually involves unbolting the upper and lower mounts.
-
Install the New Components: Whether it’s a “spacer” that sits on top of your strut or a completely new, longer coilover, follow the torque specs religiously.
-
Correct the Angles: This is where the Upper Control Arms (UCAs) come in. High-quality kits often include new UCAs to keep your ball joints from being at a “stressed” angle.
Step 3: The Rear Suspension (The Heavy Lifting)
The rear is usually simpler, involving either “Blocks” or “Add-a-Leaf” systems.
-
Support the Axle: Use your jack to keep the axle from crashing down when you remove the U-bolts.
-
Swap the Blocks: Slide the new, taller blocks between the axle and the leaf spring.
-
Extended Shocks: A taller truck needs longer shocks. If you use stock shocks with a lift, they will “top out” and break on the first pothole.
Step 4: The Driveline and Brake Lines
As the truck goes up, the distance between the transmission and the axle increases.
-
Brake Line Extensions: Ensure your brake lines aren’t pulled tight like guitar strings when the suspension is fully extended.
-
Driveshaft Alignment: On larger lifts (4″+), you may need a Transfer Case Drop Kit to prevent vibrations.
Expert Advice: The “Hidden Warning” of the First Drive
Tips Pro: The “Final Torque” Secret.
One of the most common mistakes beginners make is tightening the suspension bolts while the truck is still up on jack stands. Never do this. > Suspension bushings are designed to “twist” from a neutral position. If you tighten them while the wheels are dangling, the moment you put the truck on the ground, the bushings will be permanently stressed. Always do your final torque with the full weight of the vehicle on the tires.
Scannable Checklist: Post-Installation Safety
-
[ ] The “Retorque” Rule: After 50 miles, go back under the truck and check every bolt. Suspension settles, and things will loosen up.
-
[ ] Headlight Re-alignment: Your truck is now pointing higher. If you don’t adjust your headlights down, you’ll be blinding every driver on the road.
-
[ ] Professional Alignment: Your “toe” and “camber” are now completely out of spec. Drive directly to an alignment shop—do not wait. You can ruin a $1,500 set of 35-inch tires in less than 200 miles with a bad alignment.
LSI Keywords for the Pro Builder:
-
Caster and Camber: Alignment angles affected by the lift.
-
CV Axle Angles: The angle of the front drive axles on 4WD trucks.
-
Bump Stops: Extensions used to prevent the suspension from bottoming out.
-
Panhard Rod: A bar used in some rear suspensions to keep the axle centered.
Maintenance and Long-Term Care
Lifting a truck increases the leverage on your wheel bearings and ball joints. Expect to inspect these components twice as often as you did when the truck was stock. If you hear a “pop” or a “clunk” when turning, address it immediately. In the world of lifted trucks, a small noise today is a broken axle tomorrow.
Conclusion: The View from Above
Knowing how to install a lift kit on a truck transforms your relationship with your vehicle. It moves from being a simple appliance to a custom-built machine capable of exploring the road less traveled. It’s a lot of work, and your back will likely ache for a few days, but that first time you climb into the cab and look down at traffic, it all becomes worth it.
Take your time, use the right stands, and remember: the kit isn’t “done” until the alignment shop gives you the green light.
Are you planning a subtle 2-inch leveling kit for a cleaner look, or are you going for a full 6-inch monster lift to dominate the trails? Let’s talk about your build in the comments!